330- 3D Computer Modeling
3D Computer Modeling
High Poly Door-
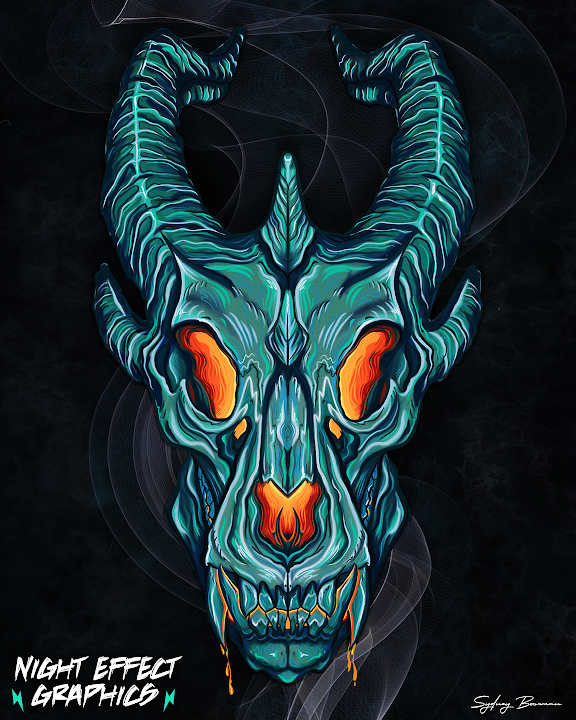
For this assignment we sculpted our high poly version of our door. For this assignment I mostly followed the concept art I shared previously but I still plan on adding a bit more detail to the door to bring it all together. I still would like to add a alpha imprint to the top of the piece and add the detail coming down from the sun design. I still struggled with Zbrush but I felt a lot better compared to our mug assignment. Zbrush is a super cool program that I would love to learn to navigate better. I am still not super satisfied with my door but I think once I add the last touches it will be a lot better.
One thing I do kind of regret doing is cutting off the backside of the model. In Maya that is a common thing to do if the "player" wont see the back but with zbrush it can distort the model and make things more difficult.
The next step is to create a low poly version which I plan to do in Maya. I already have a pretty similar low poly model done in Maya so it should not be that difficult to complete.


Door Assignment -
For this assignment we will be using Maya and Zbrush to sculpt a stylized door and then using Marmoset to be doing our final render. These are just a few ideas that I have so far for my door reference. For the first picture I am really just wanting to take the head from the top. I plan to design him more in my style but I like that concept. The second picture I just wanted to uses a star like design like the one it has in the middle but other than that I probably wont use much from that door. I really like the third door and will probably use this one the most. If I have enough time I would like to add those stairs and the vine. I mainly want to use the pillars and the main shape of the door for that one as well.
I really want to do well on this project because of how poorly I executed the last assignment, the beer mug. So I am going to really push myself and put a lot of time into this.


Assignment - Game Controller
For This assignment we were given the task to create a 3D controller model in Maya and then texture in Substance painter. I started out with gathering reference and bringing it into Maya. Once I got all of the measurements correct I mostly used my own ps4 controller I have at home.


This is what my controller looked like at first, I used a blocking method started out with a basic square and extruded and used cylinders for the joysticks. I ended up deleting half to make it easier and just duplicated it when I was happy with the one side.

This is what my basic right side of the model looked like. I had the problem of adding too much geo and had to delete a lot so shaping the model wasn't so hard.

I then duplicated the left side of the model and modeled the arrow buttons which I did have problems with. Here I checked all the geo to make sure there was no endgons and open polys. This step actually took me the longest because I had a lot of triangle I had to figure out how to fix and some lines that I needed to finish. My file also got corrupted so I was dealing with a lot of crashes but got that figured out and was finally able to Uv my model.

This was my first Uv of my model, which I did go back and change a bit to fix some seams but it is the basic idea. I then made sure my Outliner looked good and organized everything. I also added "_low" to this model. After the first upload to substance I did end up going back and adding more geo to it by softening it.


This was my next step in the process, assigning materials. This is a part that I also messed up at because I made too many Shader materials and in the end did not have enough time to go back and change. But i got the basic idea right and duplicated my low poly model and made a high poly by softening it more. I actually softened my high poly more that what it shows in the picture.


These were my final renders of my model. The assignment was to bring your model into Marmoset to render but because I had messed up the Shaders in Maya and didn't realize it until I went to upload into Marmoset. I tried to make it work in Marmoset but could not figure it out in time, so I was forced to Render in Substance. This was a huge bummer because I had put so much time and effort into this model and didn't even make it to the last step. But I am personally happy with my renders and what I was able to accomplish because I have personally never modeled like this before. I was a huge challenge for me but I did try my best. There is still things I want to go back and fix and some things I am not happy with but I did what I could and I learned so much from this assignment.

Comments
Post a Comment